A date picker, popup calendar or date time picker regardless of the name, is a graphical user interface widget that allows users to select a date from a calendar.
Recently at ZEALS.ai we have released RPA Post Logs. If you use this feature, you will come across a calendar to pick dates and even times. These calendars make the entire process of choosing dates easier and more interactive and play a significant role in improving user experience.
As a tester, automating the datepickers in a dynamic way can be an intimidating task. There are several ways to handle calendar controls. Therefore in this testing blog, I will explore a test case that demonstrates how to select a date in Selenium Webdriver using Java.
Selenium is a widely used automation testing tool with the purpose of ensuring web applications function smoothly and according to specific technical and business requirements.
ZEALS.ai’s Calendars:
At ZEALS.ai we have different type of calendars such as:
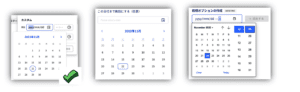
This article uses Post Logs [Calendar 1], but the goal is to automate the calendar dynamically, so the basic approach should work for all of ZEALS.ai’s calendars.
Approach to Handling the Calendar:
If your calendar has editable text fields, it is easier to use input fields. You just have to consider the expected date format. However, in our case, these fields are either disabled or not editable. Therefore, we will be using a different approach.
If you look at the calendar, once users click the calendar button, they have the option to select the Year / Day / Month of their choice. This Option could be in the past, present, or future. We can think of it as a Target date. For this purpose, I will create a Java Class which handles all the Date picker components. Let’s take a deeper dive into the approach:
- Open the Date Picker / Calendar.
- Get the current Month and Year (this can be accessed via the current month label).
- Compare the current Month and Year to the target Month and Year.
- Find out if the user needs to navigate to the past, future or present to meet the Target date.
- Use the < > component to navigate to the past or future calendar page.
- Select the desired day.
- Finally perform some Tests.
Note: Ideally this approach should work for all the calendars shown above as they have similar components.
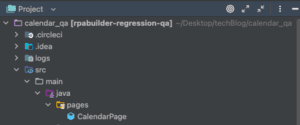
Step 1: Create a Calendar Page/Framework
First create a Class and add different calendar components which will interact with the UI calendar.
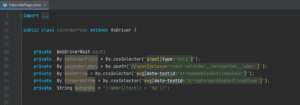
We already have an internal Automation Test Framework, and I will be utilizing some of its features for the initial setup such as Webdriver setup, Login and navigating to the desired calendar destination. I will not be sharing or discussing those features in this blog.
Within this class, create a class constructor that accepts the Webdriver that needs to interact with the browser and all the elements that they need to interact with. Thanks to our Frontend team for providing nice test-data IDs, which we can use to interact easily with different calendar components.
Step 2: Decide the Target Dates / Test Cases
I will be creating up to Five Test cases. One with past date, one with future date, one with current month date. Our goal is to create a date picker framework which can handle multiple valid dates.
I will be using the date at which ZEALS.ai’s founded in (2014年4月1日) for this purpose
- (Past Date) 2014 April, 1
- (Future Date) 2023 April, 1
- (Current Date) 2022 Nov, 22
- (Octal Value Test, since we will be Formatting the date) 2022 April, 01
- (Duplicate Value) 2023 Aug, 31
Step 3: Open the Calendar
The first thing we need to do is open the date picker. However, it is always a good practice to consider if the Calendar is already opened. It will not be the case with our current Date Picker design. However, since we are trying to create a more dynamic automation framework, we will consider adding a validation to make sure if “click” is required.
Step 4: Get the Current Month/Year
Now that the date picker is opened, the first thing we need to do is to capture the current Month and Year. This can be easily achieved by reading the calendar Label 2022年11月 and splitting it into an array and using it to create a LocalDate object.
It is worth mentioning that I will be using a Java LocalDate Class. A LocalDate class is an immutable datetime object representing a date, often displayed as year-month-day. We can also access other date fields, such as day of the year, day of the week, and week of the year. It also allows us to format the date. For example, the value “2014 April, 1” can be stored in LocalDate.
Step 5: Compare the Current and Target Month/Year
Now that we have determined the current Month/Year in the last step, the next thing we need to decide is whether we need to move from the current month to the past or the future. Since the user will be providing the Target dates, in this case we can achieve this goal by comparing the current and target dates.
Not forgetting the day of the month is yet to be selected. In this step I will set it to the first day of the month, this can be achieved with LocalDate method withDayOfYear(int dayOfYear).
Here and now, we have a current Date (Year/Month/Day). We can now simply compare the current and Target dates.
Step 6: Where to? Current, Past, Future!
Once you have the month difference value, you can identify the month of interest. A negative value is a month in the past, a positive value is a month in the future, and a value of zero is the current month.
Step 7: Navigate to the Target Month/Year
Next, we can use the < > arrows to navigate to the desired target Month/Year. Plus, we can control this through a loop.
Step 8: Select the Desired Day
Since we are on the Target Month/Year, selecting a day is straightforward. We have the locator and simply click the required day of the month.
But if your calendar dates repeat, this implementation won’t work, so don’t get carried away. The Post Logs calendar is fine as it does not contain recurring dates. However, in the following calendar if the target date is August 31, then July 31 will be selected instead.
To make this more dynamic we should consider both cases. Now, if the selector used for the above is again used for implementation, it will not be helpful.
Therefore, after reviewing the DOM, we will be changing the locator to:
Next, we need to modify our setDay method to accommodate the new selector’s value.
Step 9: Testing! Testing! Testing!
Finally, we will perform the Test on our date picker framework. As shared above we will be running Five tests and as you can see All Tests passed!!
Conclusion
I hope this tech blog has been useful to you, helping you to understand how to make an automated Calendar using Selenium WebDriver for testing. As mentioned before, these calendars make the entire process of choosing dates easier and more interactive and play a significant role in improving user experience and this particular one incorporates a date picker framework that is both useful and user friendly.